SignalK Node.js plugin for ReSTful control of switches connected to GPIO pins on the Raspberry Pi. The plugin allows you to make ReSTful calls using GET and PUT to read and write the GPIO pin state. The purpose of the plugin is to provide a convenient way of controlling lights and other equipment from OpenCPN plugins, mobile applications, web browsers, and other type of applications. The plugin utilises Brain Cooke’s onoff library.
License
scans_signalk_swich is free software: you can redistribute it and/or modify it under the terms of the GNU General Public License as published by the Free Software Foundation in version 3 of the License.
scans_signalk_switch is distributed in the hope that it will be useful, but WITHOUT ANY WARRANTY; without even the implied warranty of MERCHANTABILITY or FITNESS FOR A PARTICULAR PURPOSE. See the GNU General Public License for more details.
You should have received a copy of the GNU General Public License along with scans_signalk_switch. If not, see https://www.gnu.org/licenses/.
Installation
This short tutorial assumes that you have an installed and working signalK Node JS server. If not, the software and instructions for doing this are here: https://github.com/SignalK/signalk-server-node
Plugins are installed in the node_modules directory inside SignalK server’s configuration directory ($HOME/.signalk by default).
$ cd ~/.signalk/node_modules
$ git clone https://github.com/susannecoates/signalk-scans-switch.git
login to your Signalk server as an administrative user and restart the server.
Configuring the Plugin
After installing the plugin you should be able to navigate to the signalk server using your browser, login as admin, and go to: Server->Plugin Config. The scans switch plugin should be listed among the available plugins. Expand the plugin’s section and add the information shown below. Be sure to tick the “Active” box to enable the plugin.

Now click “+” and add a switch as shown in the screenshot:

Now click Submit to save the changes and restart the server to start the plugin.
This switch will be used in the example below.
Using the Plugin to Control Digital Switches
For information on the GPIO pins for the RPI please see: https://elinux.org/RPi_Low-level_peripherals
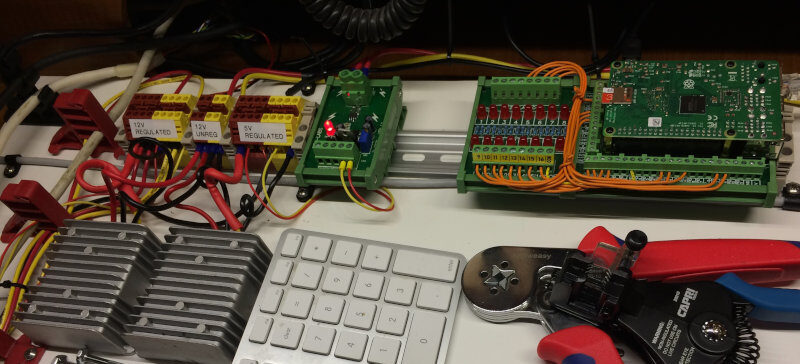
RPI GPIO Testing Setup
A convienant way to test the operation of the plugin is to use LED’s connected to the GPIO pins using a 10K ohm 1% resistor. This can either be done on a breadboard or using a setup like that shown in the photo below. The setup in the photo uses an RPI 3B+ on a DIN rail mount screw terminal (breakout) block adapter module connected to a DIN rail mount 16 LED indicator light module. Either way will allow you to visualise the state of the desired GPIO pins to verify the correct operation of the module and of your GET/PUT requests.

Once you have everything working with the LED’s test setup it’s relativly straightforward to replace the LED’s with solid state switches. Always be mindful of how much current the switch needs to drive its control input versus what the GPIO pin can provide. Ideally, the solid state switch should have optoisolated control inputs.
Another handy tool for testing is a ReST API Development tool, which will allow you to test your queries and generate code in a variety of languages. The examples below use Postman which, at the time of this writing, is freely available as an app for Google Chrome.
ReSTful Interactions with the SignalK Server
NOTE: The SignalK server used for the examples below is configured to listen for requests on the default HTTP port 80 and as such the port need not be specified in the URL (e.g. http://192.168.0.21 is the same as http://192.168.0.21:80). If you have configured your server to use a different port, say 3000, you must include the port in the URL (e.g. http://192.168.0.21:3000).
To verify that things are working you should now be able to perform a GET request. You can do this with your browser by entering:
http://192.168.0.21/signalk/v1/api/vessels/self/electrical
in the address bar. NOTE you’ll need to replace the address 192.168.0.21 with the address of your signalk server. The server will reply with a JSON formatted message:
{"switches":{"bowlight":{"state":{"value":0,"$source":"signalk-scans-switch.XX","timestamp":"2020-09-05T17:33:47.602Z"}}}}
Using Postman for the GET will generate the same response, but in a more readable format:

Changing the state of the switch with PUT
- generate a version 4 UUID
Generate a version 4 UUID on the RPI command line by typing:
uuid
which will produce output like this:
fddd9e58-e0e7-11ea-b681-07151df731b6
This UUID will be used as the requestID for the next step. Now you need to authenticate with the server and get a token.
- Getting the access token
If your SignalK server is at 192.168.0.21, and your user name on the server is system, and your password is system, then using Postman the request would be set up as follows:

Important Note: You must have the correct mime type selected “JSON (application/json” otherwise the server will not understand your request and you will get an error. e.g. “Missing Parameters”.
Using cURL the request would look like:
<?php
$curl = curl_init();
curl_setopt_array($curl, array(
  CURLOPT_URL => "http://192.168.0.21/signalk/v1/auth/login",
  CURLOPT_RETURNTRANSFER => true,
  CURLOPT_ENCODING => "",
  CURLOPT_MAXREDIRS => 10,
  CURLOPT_TIMEOUT => 30,
  CURLOPT_HTTP_VERSION => CURL_HTTP_VERSION_1_1,
  CURLOPT_CUSTOMREQUEST => "POST",
  CURLOPT_POSTFIELDS => "{\n  \"requestId\": \"fddd9e58-e0e7-11ea-b681-07151df731b6\",\n  \"username\": \"system\",\n  \"password\": \"system\"\n}",
  CURLOPT_HTTPHEADER => array(
    "cache-control: no-cache",
    "content-type: application/json"
  ),
));
$response = curl_exec($curl);
$err = curl_error($curl);
curl_close($curl);
if ($err) {
  echo "cURL Error #:" . $err;
} else {
  echo $response;
}
or in NodeJS this would look like
var http = require("http");
var options = {
  "method": "POST",
  "hostname": "192.168.0.21",
  "port": null,
  "path": "/signalk/v1/auth/login",
  "headers": {
    "content-type": "application/json",
    "cache-control": "no-cache",
  }
};
var req = http.request(options, function (res) {
  var chunks = [];
  res.on("data", function (chunk) {
    chunks.push(chunk);
  });
  res.on("end", function () {
    var body = Buffer.concat(chunks);
    console.log(body.toString());
  });
});
req.write(JSON.stringify({ requestId: 'fddd9e58-e0e7-11ea-b681-07151df731b6',
  username: 'system',
  password: 'system' }));
req.end();
Whichever method you choose to use the server should respond back (in JSON format) with the token.
{
  "token": "eyJhbGciOiJIUzI1NiIsInR5cCI6IkpXVCJ9.eyJpZCI6InN5c3RlbSIsImlhdCI6MTU5NzcxMDY0MCwiZXhwIjoxNTk3Nzk3MDQwfQ.hHYmpHmIyONFVUClhnXAPGP81-s1PU90ae8D-bLllGw"
}
- Making the PUT request In postman add the following to the headers:

The body of the request should look like the body secion below. When you click Send the server should respondback with the “Pending” status message as shown.

Using cURL in PHP
<?php
$curl = curl_init();
curl_setopt_array($curl, array(
  CURLOPT_PORT => "80",
  CURLOPT_URL => "http://192.168.0.21:80/signalk/v1/api/vessels/self/electrical/switches/bowlight.state",
  CURLOPT_RETURNTRANSFER => true,
  CURLOPT_ENCODING => "",
  CURLOPT_MAXREDIRS => 10,
  CURLOPT_TIMEOUT => 30,
  CURLOPT_HTTP_VERSION => CURL_HTTP_VERSION_1_1,
  CURLOPT_CUSTOMREQUEST => "PUT",
  CURLOPT_POSTFIELDS => "{\n   \"value\": 1\n}",
  CURLOPT_HTTPHEADER => array(
    "cache-control: no-cache",
    "content-type: application/json",
    "token: eyJhbGciOiJIUzI1NiIsInR5cCI6IkpXVCJ9.eyJpZCI6InN5c3RlbSIsImlhdCI6MTU5NzcxMDY0MCwiZXhwIjoxNTk3Nzk3MDQwfQ.hHYmpHmIyONFVUClhnXAPGP81-s1PU90ae8D-bLllGw"
  ),
));
$response = curl_exec($curl);
$err = curl_error($curl);
curl_close($curl);
if ($err) {
  echo "cURL Error #:" . $err;
} else {
  echo $response;
}
In NodsJS
var http = require("http");
var options = {
  "method": "PUT",
  "hostname": "192.168.0.21",
  "port": "80",
  "path": "/signalk/v1/api/vessels/self/electrical/switches/bowlight.state",
  "headers": {
    "content-type": "application/json",
    "token": "eyJhbGciOiJIUzI1NiIsInR5cCI6IkpXVCJ9.eyJpZCI6InN5c3RlbSIsImlhdCI6MTU5NzcxMDY0MCwiZXhwIjoxNTk3Nzk3MDQwfQ.hHYmpHmIyONFVUClhnXAPGP81-s1PU90ae8D-bLllGw",
    "cache-control": "no-cache",
    "postman-token": "bbb04c10-bca4-13e0-ef83-14d8a2099fa0"
  }
};

var req = http.request(options, function (res) {
  var chunks = [];

  res.on("data", function (chunk) {
    chunks.push(chunk);
  });

  res.on("end", function () {
    var body = Buffer.concat(chunks);
    console.log(body.toString());
  });
});

req.write(JSON.stringify({ value: 1 }));
req.end();
}
If successful, the server will respond with:
{
  "state": "PENDING",
  "requestId": "63effa0f-9fcd-471a-92b9-7d5d6a34d0c8",
  "statusCode": 202,
  "href": "/signalk/v1/requests/63effa0f-9fcd-471a-92b9-7d5d6a34d0c8",
  "user": "system",
  "action": {
    "href": "/signalk/v1/requests/63effa0f-9fcd-471a-92b9-7d5d6a34d0c8"
}
And you should see the state of the switch (or LED) change.